Fifer’s Web site — on the Web since 1995! |
|||||||||||
|
|||||||||||
Transparent Floating Panes
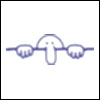
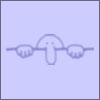
The Basic Concept The Basic Concept:You aren’t setting something to actually be transparent. This function isn’t fully realized yet, so we have to fool your browser. What we’re essentially doing is having 2 layers that start from an absolute position of the bottom left corner of your screen, that are identical - but with different “colors.” Example:
The white is the bottom layer. The blue is the positioned exactly over the white. The trick is in telling the browser when to show the blue one, and when to ignore it and let the white one show through.
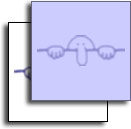
2 different opaque layers Each graphic will originate from the same exact position in the bottom left corner of the screen, overlapped exactly on top of each other. Visible vs. InvisibleNow, we need to figure out how to fool the browser into hiding the top layer when it’s not needed. We do this with div tags and your cascading style-sheet (css) definitions. Step 1First, we define your bottom-background image: .bottom_bg {
background-image: url(bottom_bg.jpg);
background-repeat: no-repeat;
background-attachment: fixed;
background-position: 0px 100%;
background-color: #FFFFFF;
}
This is saying, “Use this background graphic, don’t repeat it, and don’t let it scroll up or down when the user uses the scroll bars.” Your point of reference will be 0px from the left and 100% from the top. (This is the part that doesn’t work in Internet Explorer - Read more)
For example.html I made the <body class="bottom_bg"> , or you could make a <div class="bottom_bg"> if you want - just be aware it may not show up until you have enough content to start intersecting with the graphic, whereas body forces the full-width and height of your browser window. Step 2Within that div (or body) tag, you need to define your window pane. We use div tags to define this, as well. Since we want a nice “window” effect anyway, we can add some margins and a nice little border around our pane like so: .top_bg {
background-image: url(top_bg.jpg);
background-repeat: no-repeat;
background-attachment: fixed;
background-position: 0px 100%;
background-color: #E5E5E5;
padding: 5px;
margin: 10px;
border: 1px solid #AAAAAA;
}
See example.html to see what it looks like. Optional StuffYou don’t need padding, margin, or border definitions. These just “pretty it up.” Background-color (even if it seems redundant to background-image) however, must stay in. If you don’t have this, then your div will only change color over the image area, and you’ll have “cut off” lines where the graphic stops. If you have a bar on the left or right, like I do (for menu stuff) you can set your graphic to start at 200px 100%, if you’d like. Or, if you want it up from the bottom, set 0px 80% or something. The only problems is the percentage is going from the top - and since you can’t guarantee the size of everyone’s browser, the bottom is a moving target. So percentage is your best bet. And, for whatever reason, you can’t (as far as I can tell) anchor the graphic from the top-left corner. Using Multiple Top ColorsYou may notice throughout my site that there are actually 3 examples of floating transparent panes (unless you have i.e. in which case I tell my server to ignore you and give you the “vanilla” site and you miss all the good stuff.) These 3 examples are the music background of the menu to the left, the gray title-bars of posts (like at the top of this page), and the pink text-area of posts (also at the top of this page). I don’t have these panes on top of anything except the base (bottom_bg.jpg) layer. So essentially - steps 2 & 3 are repeated for each one, but called different names and with different values/definitions, and used “in-line” instead of overlapping each other. Problems with Internet ExplorerInternet Explorer interprets the css differently than Mozilla (what I like to use.) In this case, while we’re trying to fool it into using several identical layers laid exactly on top of one another, in a fixed position... I.E. will use the starting point relative to the div tag. That is, your bottom_bg.jpg may start from the bottom of your screen on the left, but your top_bg.jpg will start from the bottom-left of wherever your div ends. And it will scroll, despite the “fixed” attribute. The background image won’t, but the top will. So, we have skewed layers and cut-off graphics that look like floating puzzle-pieces, rather than a nice transparent window pane.
|
|||||||||||